top of page
Work
Below you will find a selection of some of my original character designs, as well as a breakdown of the process I use to create my illustrations
Illustration: Text


Illustration: Selected Work

Process
Every Tuesday I run a Tabletop Roleplaying Game for my friends through Roll20, a website with virtual tabletop tools that allows my players to join remotely. Because we play through a digital tabletop simulator, I design digital assets to use in the game instead of using physical miniatures and maps. When I introduce a new important character or enemy type, I design a small “head shot” to use as a token on the board. As an example of my process, I will show how I went about designing assets for one player character: Ha-Ter.
Illustration: Image
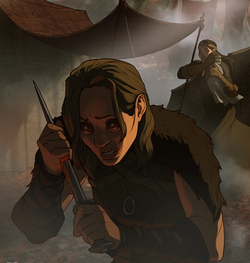
Ha-Ter is a Qunari Blood Mage. To create a design for this character, my number one priority was to make sure that her appearance reflects her personality and culture in a way that one could tell what kind of role she inhabited at a glance.
To do that, I first did some research into how similar characters have been portrayed in this IP. In this setting, Qunari are known for being large, intimidating, and stern. Their culture is very utilitarian, and their clothing reflects this. I found some examples of different types of Qunari armor on the internet and compiled a folder to give me inspiration for the final design.
Illustration: Text
 |  |  |  |  |  |
|---|
Illustration: Gallery
For this character design, I needed two things: a head shot which would serve as her token on the game board, and a full body shot as a portrait for her character sheet. Each presented their own challenges.
For the head shot, I needed to make sure that the color blocking was clear, and that her color scheme was distinct from that of the other characters on the board. This means that when the map is zoomed all the way out, it is just as easy to tell which character is which as when the map is zoomed in. For the full body shot, I needed to make sure that her body language, armor, and weapon clearly communicated more detail about who the character is.
Illustration: Text
 |  |  |
|---|
Illustration: Gallery
I started the process with a physical sketch, which I then scanned and opened in photoshop. From there, I created line art and blocked out the basic colors. At this point I cropped the image down to just the head shot and saved it as a separate document. From here, I incorporated highlights, shadows, and gradients to bring the head shot to the same level of detail as the head shots of the other player characters.
Illustration: Text

Ha-Ter sketch.jpg

Ha-Ter headshot.jpg

Thagor Headshot.png

Zethrian Portrait headshot.jpg
Illustration: Gallery
After that, all I had to do was upload the images to Roll20 and assign them to Ha-Ter’s character token. Her player was very happy with the result!
Illustration: Text
bottom of page